
Today, we embark on an exciting journey to explore the heart and soul of modern app development – state management. In this fast-paced world of mobile applications, delivering a smooth, responsive, and delightful user experience is paramount. And that’s where state management comes into play. Imagine your app as a living, breathing entity, constantly evolving and adapting to users’ interactions, data changes, and network responses. How do we manage this dynamic flow of information effectively? How can we ensure that our app remains scalable, maintainable, and robust as it grows?
In this keynote, we dive deep into the core concepts of state management, unlocking its true potential to elevate your Flutter applications to new heights. We’ll uncover the challenges faced in handling app state, explore various state management approaches, and embrace cutting-edge techniques that simplify the process.
So, let’s embark on this enlightening expedition, as we learn to empower our apps with dynamic potential through the art and science of state management. Together, we’ll forge a path towards building user-centric, efficient, and future-ready Flutter applications.
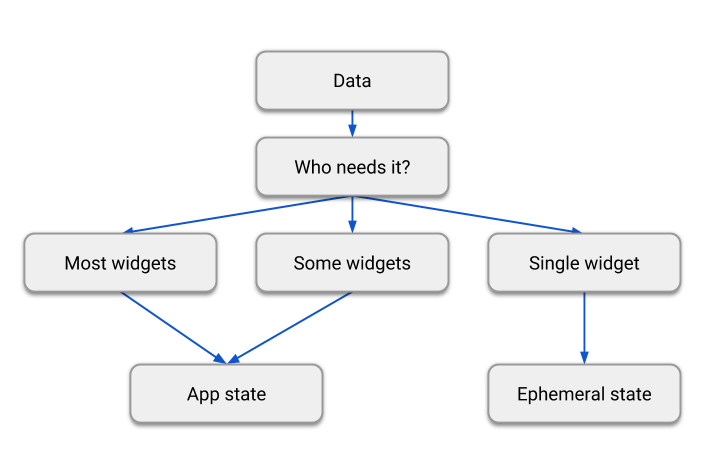
In Flutter, ephemeral state refers to the temporary and short-lived data that is meant to be used within a single widget’s lifecycle or for immediate UI updates. It is not meant to be shared or persisted across different screens or app sessions. Ephemeral state is typically managed using local variables or stateful widgets, allowing developers to handle small-scale changes and user interactions efficiently without introducing unnecessary complexity or overhead in the overall app architecture. Once the widget is disposed of or the UI is refreshed, ephemeral state data is discarded, making it ideal for managing small UI-specific states that do not need to be preserved over time.
In Flutter, the app state refers to the global data and information that needs to be maintained throughout the entire lifecycle of the application, across different screens and widget hierarchies. It represents the core data and state of the application, such as user authentication status, user preferences, data fetched from APIs, and any other information that needs to persist and be accessible across various parts of the app. Managing the app state effectively is crucial for ensuring consistency and coherence in the user experience. Commonly, app state is handled using state management solutions like Provider, Riverpod, Redux, or MobX, which allow for efficient and organised sharing of data between different widgets, screens, and components, without causing unnecessary dependencies or re-rendering of the entire UI.
State management lies at the very heart of building interactive and dynamic user interfaces. State is the data that changes over time and directly impacts the appearance and behaviour of widgets within an app. Whether it’s a simple button click or a complex network request, handling dynamic data efficiently is essential for providing a seamless user experience.
In Flutter apps, “state” is like a collection of data that can change while you’re using the app. For example, imagine a counter app where you can tap a button to increase or decrease the count. The count value is the “state” here. When you tap the button, the app updates the count, and you see the new number on the screen. Flutter is clever enough to keep track of such changes and update the app’s appearance accordingly. So, state is essential because it allows the app to show real-time changes as you interact with it.
To manage state in Flutter, there are different ways, like using setState, BLoC, Provider, Riverpod, Redux, and MobX. Think of these as tools or methods to keep track of the changing data and make sure the app displays the correct information. For simple apps, setState is good enough, but as apps get more complicated, it can become tricky to handle state effectively with just setState.
» BLoc: BLoC helps separate the app’s “business logic” (the rules and calculations) from how the app looks. It’s useful for more complex apps because it organises the code well.
» Provider: Provider is a simpler way to manage state, especially for smaller apps. It makes it easy to share data across different parts of the app and help keep things neat and tidy.
» Riverpod: Riverpod is an improved Version of Provider, offering better performance and more flexibility in handling state.It’s popular among Flutter developers for its ease of use and efficiency.
As apps become bigger and more complicated, handling state can become a challenge. The code can get messy and hard to understand. Sometimes, using complex state management patterns can add too much extra code and make things even more confusing.
To deal with these challenges, developers look for simpler state management solutions that are still powerful enough to get the job done. They want something that’s easy to use and maintain but doesn’t make the app slow or hard to work with. Striking this balance is essential to keep the app running smoothly and making it easy for developers to update and improve it over time.
Riverpod (anagram of Provider) is a reactive caching framework for Flutter/Dart.
Using declarative and reactive programming, Riverpod is able to take care of a large part of your application’s logic for you. It can perform network-requests with built-in error handling and caching, while automatically re-fetching data when necessary.
Modern applications rarely come with all the information necessary to render their User Interface. Instead, the data is often fetched asynchronously from a server.
Riverpod tries to solve those problems, by offering a new unique way of writing business logic, inspired by Flutter widgets. In many ways Riverpod is comparable to widgets, but for state.
Before anything, you need to be aware that Riverpod is spread across multiple packages, with slightly different usage.
The variant of Riverpod that you will want to install depends on the app you are making.
You can refer to the following table to help you decide which package to use
|
App Type |
Package Name |
Description |
|
Flutter only |
A basic way of using Riverpod with flutter. |
|
|
Flutter + flutter_hooks |
A way to use both flutter_hooks and Riverpod together. |
|
|
Dart only(No Flutter) |
A version of Riverpod with all the classes related to Flutter stripped out. |
Add the package to your pubspec.yaml file
|
dependencies: |
For widgets to be able to read providers, we need to wrap the entire application in a “ProviderScope” widget. This is where the state of our providers will be stored.
|
void main() { |
Providers: Now that we have installed Riverpod, let’s talk about “providers”.
Providers are the most important part of a Riverpod application. A provider is an object that encapsulates a piece of state and allows listening to that state.
How to Define a Provider
|
final welcomeProvider = Provider( (ref) => 'Hello' ); |
A function that creates the shared state. That function will always receive an object called ref as a parameter.This object allows us to read other providers, perform some operations when the state of our provider will be destroyed, and much more.
Now, you can use the provider within your app in two ways. The simplest way is by changing the StatelessWidget to a ConsumerWidget.
|
///
StatelessWidget Changed to ConsumerWidget |
While using the ConsumerWidget, you have to add one more argument to the build() method, i.e., WidgetRef , and usually, it is named ref.
If You Use the statefulWidget there is also ConsumerStatefulWidget here is an example of StatefulWidget
|
///
StatefulWidget Changed to ConsumerStatefulWidget |
You can use this ref.watch method to get access to the String stored in the provider and store it in a variable that you can display inside a Text widget.
|
final welcomeString =ref.watch(welcomeProvider); |
The second (and better) way to use the provider is by keeping the MyApp widget as a StatelessWidget and then wrapping the widget that you want to rebuild with a widget called Consumer. (This doesn’t rebuild the entire widget inside the build() method, optimising widget rebuilds.).
|
class MyApp extends StatelessWidget { |
All Providers have a built-in way to add extra functionalities to your different providers.
At the moment, there are two modifiers available
.autoDispose, which will make the provider automatically destroy its state when it is no longer being listened to.
Let’s Take Look into example of both:
|
final myAutoDisposeProvider = StateProvider.autoDispose<int>((ref) => 0);
|
The watch() method is provided by the ProviderContainer class, which you can access from your Flutter widgets using the ProviderScope widget. This method allows you to “watch” a specific provider and automatically rebuild your widget whenever the value of the provider changes.
Automatic Rebuilding: When you use the watch() method to observe a provider, Riverpod handles the subscription to the provider’s state for you. If the state of the provider changes (for example, due to an update you make using ProviderContainer), any widget that is using watch() on that provider will automatically rebuild with the new data.
The read() method is a method available on the ProviderContainer. When you call read() on a provider, you are directly accessing the current value of that provider without setting up a subscription for updates.
Usage: The read() method is useful when you need to access the current state of a provider for some specific operation, but you don’t want to cause a UI update every time the provider’s value changes. This is often used for one-time data fetches, initialization, or when you specifically need the current value without subscribing to changes.
|
Provider Type |
Provider Create Function |
Example Use Case |
|
Provider |
Returns any type [Read Only] |
A service class / computed property (filtered list)
|
|
StateProvider |
Returns any type |
A filter condition / simple state object |
|
FutureProvider |
Returns a Future of any type |
A result from an API call |
|
StreamProvider |
Returns a Stream of any type |
A stream of results from an API |
|
StateNotifierProvider |
Returns a subclass of StateNotifier |
A complex state object that is immutable except through an interface |
|
ChangeNotifierProvider |
Returns a subclass of ChangeNotifier |
A complex state object that requires mutability |
Provider is the most basic of all providers. It creates value… And that’s about it.
Provider is typically Used for:
› Caching computations.
› Exposing a value to another provider (such as Repository/ HttpClient).
› Offering a way for tests or Widget to override a value.
› Reducing rebuilds of provider/widgets without having to use select.
|
final stringProvider=Provider<String>((ref)=>'hello'); |
This line defines a provider named stringProvider that holds a string value.
To call that value we need to assign or call out through the watch method just like this example.
|
final stringValue =ref.watch(stringProvider); |
This line reads the value from the stringProvider .
The retrieved value is stored in the stringValue variable for use in the UI.
StateProvider is a type of provider in Riverpod that’s used to provide and manage a mutable state. Mutable state refers to data that can change over time, like a counter value, a user’s name, or any other data that might be modified during the app’s runtime.
StateProvider is a provider that exposes a way to modify its state. It is a simplification of StateNotifierProvider, designed to avoid having to write a StateNotifier class for very simple use-cases.
StateProvider exists primarily to allow the modification of simple variables by the User Interface.
The state of a StateProvider is typically one of:
1. An enum, such as a filter type.
2. A String, typically the raw content of a text field.
3. A boolean, for checkboxes.
4. A number, for pagination or age form fields.
You should not use StateProvider if:
1. Your state needs validation logic.
2. Your state is a complex object (such as a custom class, a list/map, …).
3. The logic for modifying your state is more advanced than simple.
|
final darkModeProvider = StateProvider<bool>((ref) { |
Define a StateProvider named darkModeProvider to manage the state of the dark mode theme.
|
final
darkModeState =ref.watch(darkModeProvider); // Access the state |
Widgets can watch the state using ref.watch and access it using the .state property.
You can update the state using the .state property, which triggers a rebuild of the widgets that are watching the state.
FutureProvider is the equivalent of Provider but for asynchronous code.
FutureProvider is typically used for:
1. Performing and caching asynchronous operations(such as network requests).
2. nicely handling error/loading states of asynchronous operations.
3. combining multiple asynchronous values into another value.
|
final
getApi=futureProvider.family<Userdata,String>((ref,page)async{ |
FutureProvider.family<Userdata, String>: This creates a family of FutureProviders that return Userdata instances based on a parameter of type String.
(ref, page) async: This is the callback function that gets executed when you use this provider. ref is the reference to the provider, and the page is the parameter you pass when using the provider.
|
ref.watch(getApi(10)); |
the getApi family of providers to fetch user data based on a parameter from the stateProvider.
ref: This refers to the ProviderReference, which is a way to access various aspects of the state management system.
watch(getApi(…)): This watches the getApi provider, which you’ve defined as a family of providers that fetch user data. It’s waiting for the future result of the getApi provider.
Note:- Both Future and Stream Provider’s watch or read method to Get the AsyncValue of Providers.
StreamProvider is like a magic tap that provides a continuous flow of changing information over time. Imagine it’s like a news ticker that keeps updating with the latest news. You set up this magic tap to provide the news, and your app can watch it to stay updated with the latest events or changes. This is great for things like real-time updates, live data, or anything that changes frequently.
StreamProvider is similar to FutureProvider but for Streams instead of Futures.
StreamProvider is usually used for
› Listening to Firebase or Web-sockets.
› Rebuilding another provider every few seconds.
|
final
numberStreamProvider = StreamProvider<int>((ref) async* { |
StreamProvider<int>: This magical provider is designed to give you a stream of whole numbers.
((ref) async* { … }): This is like a recipe for magic. The ref helps with the magic, and async* is a special way of saying “I’m going to give you numbers one by one, but it might take some time.
for (int i = 1; i <= 5; i++) { … }: It’s like a countdown from 1 to 5. The magic is going to give you numbers, but it’s going to count slowly.
await Future.delayed(const Duration(seconds: 1)): Between each number, you’ll have to wait for 1 second. The magic needs a moment to prepare the next number.
yield i: Here comes the real magic! yield means “I’m giving you something special.” The magic will give you the current number, and then it will wait to give you the next one.
In simple words, the numberStreamProvider is a special thing that gives you numbers from 1 to 5, one number every second. It’s like having a magical counting machine that creates a slow, steady stream of numbers for you
To call this StreamProvider
As you know How to call Provider
StateNotifierProvider is used to provide and manage state using a StateNotifier subclass.
First, create a class that extends StateNotifier. This class will manage the state of your task list.
|
import 'package:state_notifier/state_notifier.dart'; |
Create a StateNotifierProvider to provide your TaskNotifier to your app.
|
final counterProvider = StateNotifierProvider<CounterNotifier, int>((ref) { return CounterNotifier(); }); |
CounterPage widget uses watch(counterProvider) to access the counter value and context.read(counterProvider.notifier) to call the increment function.
ChangeNotifierProvider (flutter_riverpod/hooks_riverpod only) is a provider that is used to listen to and expose a ChangeNotifier from Flutter itself.
ChangeNotifierProvider is a provider that allows you to expose a ChangeNotifier instance to your widget tree.
A ChangeNotifier is a class that extends ChangeNotifier and can hold a state. It notifies its listeners when its state changes.
We define a Counter class that extends ChangeNotifier. It holds a count and notifies listeners when the count changes using notifyListeners().
|
// create a class that extends
ChangeNotifier |
After creating a class we need to create an instance of a provider that calls this class.
counterProvider: This is the name of the variable we’re creating. It will store the provider we’re defining.
|
final counterProvider = ChangeNotifierProvider((ref) => Counter()); |
counterProvider: This is the name of the variable we’re creating. It will store the provider we’re defining.
ChangeNotifierProvider: This is a type of provider. It’s like a container that holds and manages a value that can change over time. Specifically, it’s used to work with classes that extend ChangeNotifier.
((ref) => Counter()): This part is a function that creates an instance of the Counter class. It’s the initial value that the ChangeNotifierProvider holds.
|
final counter = ref.watch(counterProvider); |
This way you can access all properties of “Counter“ Class and it also makes sure that if Any member changes, you’ll be told about it so you can react accordingly in your app using the watch method.
This way you access individual properties of Counter class.
|
floatingActionButton: GestureDetector( |
Above watch method is common for all Types of providers to access and call properties assigned to any type of provider.
Note:- In Riverpod v2 Include the AsyncNotifierProvider is a provider that is used to listen to and expose a Notifier for more info visit link.
let’s compare flutter_riverpod and GetX – two popular state management solutions in the Flutter ecosystem – based on various aspects:3
|
Aspects |
Flutter_Riverpod |
GetX |
|
Complexity |
Offers a more explicit and flexible approach to state management. It allows you to choose the level of granularity in your state management architecture. |
Provides a more concise and feature-rich solution, with a strong focus on ease of use and quick development. |
|
Flexibility |
Offers a variety of providers like Provider Provider StateProvider, FutureProvider, etc., giving you fine-grained control over state and different asynchronous scenarios. |
Combines state management with routing, dependency injection, and more. Offers a broad feature set out of the box, but might be less customizable for unique use cases. |
|
Learning Curve |
Can have a steeper learning curve due to its flexible and explicit nature, especially for beginners. It requires understanding of the Provider model. |
Has a quicker learning curve, especially for those new to state management, due to its simplicity and comprehensive documentation. |
|
Performance |
Designed with performance optimization in mind. It aims to minimise unnecessary widget rebuilds by providing fine-grained control over how data updates trigger widget updates. |
Provides reactive programming and is optimised for performance as well. It has observables and reactions to handle updates efficiently. |
|
Package Size |
Since it's part of the Riverpod package, the package size might be slightly larger if you're only using Riverpod for state management. |
It's a standalone package, which can be a smaller addition to your app's package size if you're only using GetX for state management. |
|
Use Cases |
Well-suited for projects that require a high level of customization, different state management scenarios, and complex app architectures. |
Ideal for projects where quick development, ease of use, and fewer boilerplate code are a priority. It's also great if you're looking for an all-in-one solution for state, routing, and more. |
Choose Riverpod if you prefer more control over state management, need fine-grained providers, or are looking for an alternative to Provider with a bit more structure.
Choose GetX if you want a simpler and more integrated solution that covers not only state management but also routing, dependency injection, and other utilities, especially for smaller applications.
GetX is more of a framework for Flutter than just a state management tool. GetX is better for small applications, and Riverpod is better for large products. The additional functions and utilities are unnecessary if one needs a state manager.
The choice between flutter_riverpod and GetX depends on your project’s requirements, your familiarity with state management concepts, and your preferences for flexibility and simplicity. Consider the complexity of your app, your team’s experience, and the trade-offs you’re willing to make in terms of flexibility and ease of use.
RiverPod is like a magic box that helps Flutter apps manage and share information easily. It’s a tool that keeps track of data that can change while you use the app, like the number of likes on a post or your login status. With RiverPod, developers can organise this data neatly and make sure the app always shows the correct information. It’s like having a helpful assistant that takes care of keeping everything updated and working smoothly behind the scenes, so users have a great experience using the app.
Connect with us to go live 
Sales Team
HR Team
© 2022 Created with Techy Panther